Make Algebra & PreCalculus Come Alive Using Cabri Geometry
Make Algebra & PreCalculus Come Alive Using Cabri Geometry
Function Families & the Crosshair Technique
As handheld graphing technology has become more prevalent, our students are not
spending
significant time graphing functions by pencil and paper techniques.
Nevertheless, we still want
them to recognize the graphs of key function families, and understand how
changing the constants
in the equation will affect the graph of the function.
On a TI-82/83/83plus, the students can modify various parameters in the Y=
window to explore
how these adjustments affect the graph. But this requires the student to switch
back and forth
between the Y= and graphing windows. Figures and graphs constructed in the Cabri
Geometry II
program, however, can dynamically respond to changes students make in equation
parameters. I
have been using the power of Cabri on a computer to demonstrate graphs of many
function
families to my students. An additional advantage of using the computer includes
its superi
or display qualities, with color available and a larger screen area.
The basis for these demonstrations is the “Crosshair” technique taught in the
Connecting Algebra
& Geometry summer Institute (CAG) developed by Teachers Teaching with
Technology.
This technique turns the Cabri Geometry screen into a function grapher, by using
Cabri’s
embedded coordinate geometry environment. Once this technique is mastered, it
can be used to
create graphs of any function.
Using the “Crosshair” technique to graph any function and explore its
properties:
1. On a fresh screen, Show Axes and Define Grid by clicking on the axes.
2. Use the Segment tool to lay a segment on the X-axis. This will put a boundary
on your x-
value, the dependent variable for the function .
3. Put a Point on the segment, not on the X-axis. Find the Coordinates of this
point.
4. Use Numerical Edit to place as many editable numbers on the screen as needed
in the
equation. For example, the quadratic function f(x) = ax2 + bx + c requires 3
numbers, for a,
b, and c. Use numbers with one decimal place , like 1.1, to easily manipulate
later. (see fig.1)
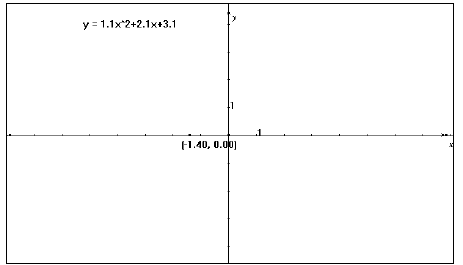
Figure 1
5. Use a Comment box to write the general equation. When
one of the previously created
numbers is needed in the equation, click on it to
include it. Then delete the original numbers.
The new numbers in the equation
are now editable.
6. Use the Calculate tool to evaluate the y-value according to the equation. To
do this, click on
the numbers in the equation and the point’s x-value as needed.
Click in the result box and
drag the result onto the screen. (see fig. 2)
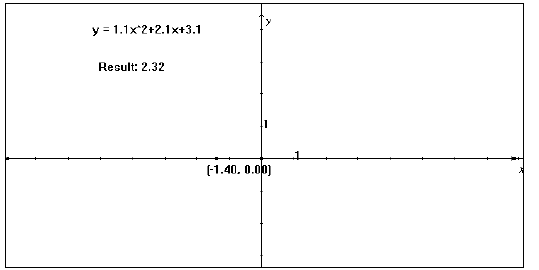
Figure 2
7. Use Measurement Transfer: click on the result of the calculation, then on the
Y-axis. A new
point appears at that y-value.
8. Create the crosshairs: construct Perpendicular Lines through the x and y
points perpendicular
to the appropriate axis. Then place a Point at the
intersection of these. (see fig. 3)
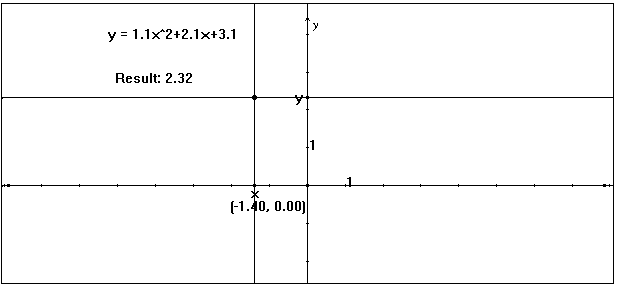
Figure 3
9. Find the Locus of this point with respect to the point
on the X-axis (see fig. 4). Do this by
clicking first on the intersection point
(the object for which to construct the locus) then on the
X-axis point (the
object that moves with respect to some path, in this case the original
segment
placed on the X-axis).
10. To edit a number in the equation, double-click on it
and use the scroll arrows that appear.
Explore what happens to the graph as the
numbers change. Since the graph updates
automatically, students see the graph
“come alive.”
Positive “a” value (Fig. 4)
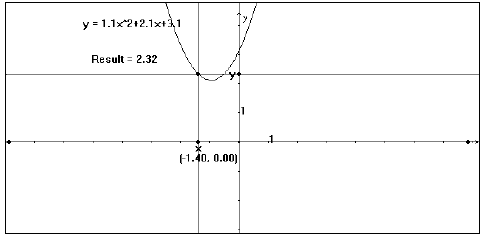
Figure 4
Negative “a” value (Fig. 5)

Figure 5
Changing the value of “c” (Fig. 6)
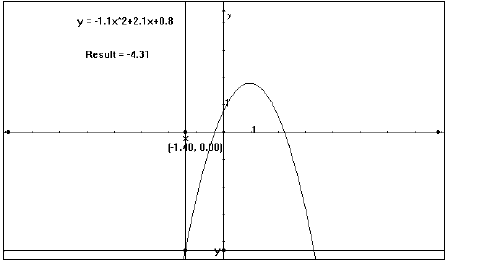
Figure 6
My personal favorite is the basic power function,
 . By
letting n equal any integer or a
. By
letting n equal any integer or a
fraction between one and zero, students can see
patterns in graphs of power functions, inverse
variation, and radical functions  .
.
As I adjust the exponent, I ask the students to predict the effect on the graph.
I also ask them to
explain what happens to the graph when the exponent equals
one or zero. The interactive
computer display stimulates a fruitful class
discussion about the properties of the graphs of power
functions, the patterns exhibited as the exponent changes, and the connection
between 
and
fractional exponents. It is a great opportunity to bring together several topics
from Advanced
Algebra or Pre -Calculus in one animated lesson. (see figs. 7-10)
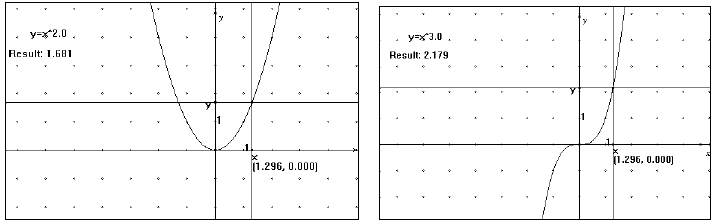 |
|
| Figure 7: positive even integer exponent | Figure 8: positive odd integer exponent |
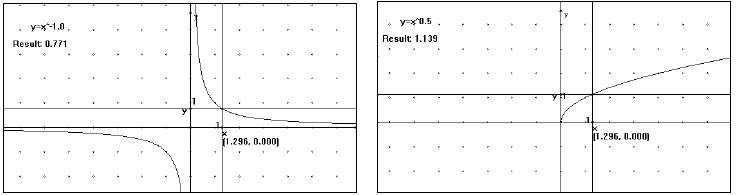 |
|
| Figure 9: inverse variation | Figure 10: square root function |
The Crosshair technique works for any type of function.
Try to build linear , polynomial,
trigonometric , exponential or logarithmic
functions using this method. It can even be used to
build conic sections in a
piecewise manner. These lessons are successful as classroom
demonstrations in
which students take notes on the graphs and discussion, or as lab activities for
individuals or pairs of students. I create the Cabri file in advance, so class
time is focused on the
dynamic view of function behavior.
| Prev | Next |